As an Amazon Associate, we earn from qualifying purchases. Some links on this site are affiliate links at no extra cost to you. Our recommendations are based on thorough research and editorial judgment.

How To Repair A Small Hole In Your Dry Bag?
To repair a small hole in your dry bag, we’ll need to start by thoroughly cleaning the damaged area with isopropyl alcohol and a lint-free cloth. Choose the right patch material – Tear-Aid Type A for nylon or Type B for PVC/vinyl bags. Apply the patch according to your bag’s material, extending at least 1 inch beyond the hole’s edges. After proper curing time, test the repair’s waterproofness by submerging the bag to check for bubbles. These essential steps will guarantee your gear stays dry, but there’s more to mastering a professional-grade fix!
Key Takeaways
- Clean the damaged area thoroughly with isopropyl alcohol and a lint-free cloth, ensuring a 1-inch radius around the hole is debris-free.
- Select the appropriate patch material – Tear-Aid Type A for nylon bags or Type B for PVC/vinyl dry bags.
- Apply waterproof adhesive like Seam Grip or Aquaseal around the hole, ensuring complete coverage of the damaged area.
- Press the patch firmly over the hole, extending beyond the damaged area, and hold for several minutes to ensure proper adhesion.
- Test the repair by inflating the bag and submerging in water or using a bright light to check for leaks.
Understanding Dry Bag Materials and Damage Types
Whether you’re an avid kayaker or weekend camper, understanding your dry bag’s material is essential for effective repairs!
When it comes to dry bag types, we’re typically looking at two main categories: PVC tarpaulin and PU-coated nylon. PVC offers superior puncture resistance but less flexibility, while PU-coated nylon gives us that sweet spot of lightweight durability with better breathability.
Let’s talk damage prevention! Most holes occur from sharp objects or repeated abrasion – you know, that annoying rubbing against your kayak or backpack. The material’s thickness (measured in Denier) plays a huge role in preventing these issues. It’s also important to consider material quality and durability, as this can influence both the longevity and effectiveness of repairs.
Watch out for these common weak points:
- Seam failures from stress
- UV damage from sun exposure
- Interior coating wear
- Delamination in multi-layer fabrics
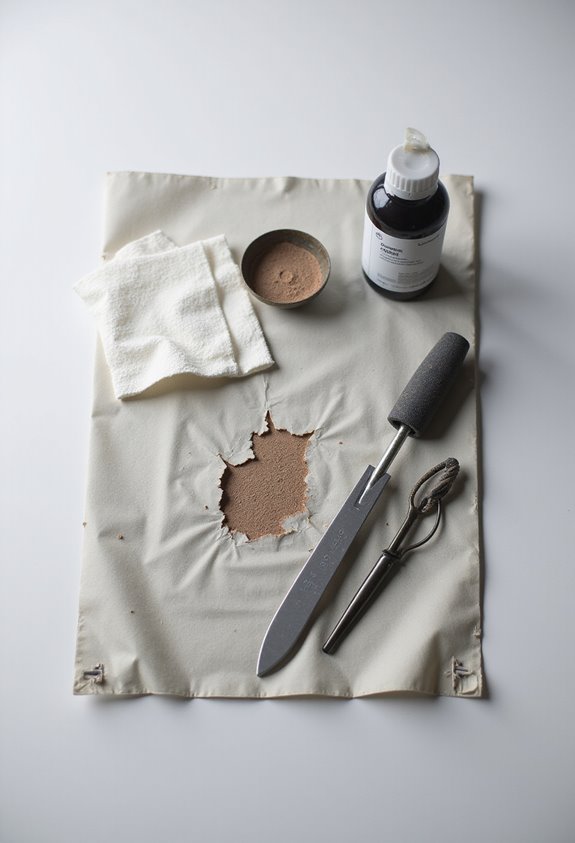
Essential Tools and Materials for the Repair

Three essential items stand at the heart of every successful dry bag repair: the right patches, proper adhesives, and reliable cleaning supplies!
When selecting patch types, we’ll want to match our dry bag’s material. PVC bags need vinyl patches, while nylon bags require fabric-specific options. Have you checked out those transparent patches? They’re perfect for keeping repairs discreet!
For adhesive options, we swear by Seam Grip and Aquaseal – they’re the dynamic duo of waterproof bonding. Just remember to pair them with the right patch material.
Don’t forget your toolkit basics:
- Isopropyl alcohol for spotless surface prep
- Sharp scissors for precise patch cutting
- Clean cloths for wiping
- A flashlight for inspecting those tricky holes
- Measuring tools to guarantee proper patch coverage
Additionally, it’s crucial to consider the waterproof rating of your dry bag to choose the most effective patching material and adhesive.
Ready to tackle that repair? Let’s get started!
Recommended Products

[Massive 26'x12'x14' + Huge Splash Pool] Fits 6–8 kids at once. Commercial grade inflatable water slide turns backyard into a water park. Extra-large pool, no crowding – perfect for parties, BBQs, and family gatherings

[STYLE]-- 16.4FT Diameter; Two Doors; White

PREMIUM BUG OUT BAG FOR 2: Developed with first responders, this 72-hour survival kit includes over 60 essentials to help you stay prepared during blackouts, earthquakes, hurricanes, and other real-world emergencies.
Preparing and Cleaning the Damaged Area
Before we plunge into patching that pesky hole, let’s make sure we’re working with a pristine surface!
First up is hole inspection – locate that troublesome spot and assess its size and location. Is it near a seam? Multiple punctures? Let’s get the full picture!
Now for surface cleaning, which is absolutely essential for a lasting repair. Here’s our tried-and-true method:
- Grab a lint-free cloth and isopropyl alcohol
- Clean both the damaged area and about 1 inch around it
- Remove every speck of dirt, sand, and oil
- Let it dry completely – no shortcuts here!
Double-check everything under good lighting. If you spot any debris or moisture, clean it again. Trust us, a perfectly prepped surface will make the difference between a repair that lasts and one that fails! Additionally, ensuring that the waterproof performance of the patching materials used is top-notch will further enhance the repair’s effectiveness.
Recommended Products

Organic Oil Spill Absorbent Powder That Outperforms Clay: FlashDry coconut coir absorbs oil, grease, and chemical spills 5-7x faster and more effectively than traditional clay floor dry absorbent, getting your team safely back to work in minutes.

Composting,Waterless,Urine diverting, off-grid, toilet

ELITE CLEANING POWER: More powerful than any other pressure cleaner in its class, the 3900 Sport is equipped with triple venturi jets & all-wheel PosiDrive, delivering unmatched vacuum power and legendary performance.
Selecting the Right Patch and Adhesive

Success with your dry bag repair starts with choosing the perfect patch and adhesive combo!
Let’s break down your patch types options:
- For non-vinyl bags (nylon, polyester, canvas), go with Tear-Aid Type A
- For vinyl or PVC-coated bags, you’ll need Tear-Aid Type B
- Self-adhesive patches work great for most waterproof fabrics
When it comes to adhesive options, many patches come with their own aggressive adhesives – perfect for a quick fix! But if you need extra holding power:
- PVC cement works wonders on vinyl materials
- Seam sealers can reinforce those patch edges
- Waterproof adhesives provide additional protection
Remember to check your bag’s material first! There’s nothing worse than applying the wrong patch type – it’s like trying to stick velcro to butter. Trust us, material compatibility is key to a successful repair. Additionally, ensuring your dry bag has fully welded seals will enhance its waterproof integrity, making it more resistant to future damages.
Recommended Products

Accessories | Complete Set of Essentials: All-in-one solution for your RV! This package includes: 1 upgraded 5th wheel RV cover (fits up to 40'-44' RV—please measure before purchase!), 1 adhesive repair patch, 1 ladder cover, 1 storage bag, 6 gutter covers, 6 wind ropes, and 3 extra long windproof straps. With premium quality and comprehensive accessories, Umbrauto RV covers are the perfect choice to keep your RV safe and sound.

【Upgraded Material】We upgrade rv cover top from 3 layers to 7 layers now! More durable and lasting. Top 7-ply non-woven fabric with built-in waterproof membrane and anti-UV treatment help to better avoid aging, disintegration and tearing due to exposure to the sun. Let your rv cover get a longer service life!

🔥 PATENTED DuPont FABRIC : Umbrauto upgraded the fabric to DuPont Hi-Teflon fabrics on the top and 4 layers non-woven on the sides. Unlike ordinary non-woven RV covers, DuPont Hi-Teflon fabrics have excellent water,oil and stain resistance. This material has PEVA material in the outer layer and cotton fleece in the inner layer, which can effectively protect the car from being scratched. Keeping warm in winter and heat insulation in summer.
Step-by-Step Patch Application Process

Diving into a proper patch repair job requires careful attention to detail and the right sequence of steps!
First, we’ll thoroughly clean the damaged area with alcohol and let it dry completely. Don’t skip this step – it’s essential for proper adhesion! After trimming any loose edges, we’ll cut our patch to extend 1 inch beyond the hole on all sides.
Now for the fun part – patch application! Apply your chosen adhesive (like Stabond or HH-66) in a thin, even layer. Position the patch carefully over the hole, pressing firmly to eliminate any pesky air bubbles.
Let’s secure that patch! Place a heavy object on top during curing, and keep your bag in a warm, dry spot. Remember – patience is key. Allow the full curing time before testing your handiwork with water! Additionally, it’s crucial to use high waterproof ratings to ensure your repair holds up against moisture in future adventures.
Recommended Products

【WATERPROOF DURABLE MATERIAL & ANTI-AGING】The Class A RV trailer cover has a reinforced polyester fabric and double stitching. Premium top layer fabric and multilayers side fabric are much more tearing-resistant than other covers, protecting your RV from UV damage, dirt, and debris, avoiding environmental hazards with its help to keep its appearance and extend the life of your camper. There is extra thick fabric in high wear areas and reinforcement panels on the straps prevent tearing in high wear areas. The fabric is thicker and more durable than other products on the market, preventing paint fading and sun damage to the trailer from harmful UV rays.

PREMIUM MATERIAL: Features heavy-duty 300D Oxford fabric on the top with 150D Oxford on the sides. The dense PU coating and tight weave deliver fully waterproof protection—so air-impermeable that even when blown directly, air cannot pass through. UV inhibitors prevent sun damage, significantly slowing degradation and extending the product's lifespan. Withstands extreme temperatures ranging from -4°F (-20°C) to 120°F (49°C).

Durable Fabric: Constructed with 300D Oxford for the roof and 150D for the sides, our cover outperforms traditional non-woven materials with enhanced waterproofing, tensile strength, and lighter weight—ideal for extreme weather from the Arizona sun to Alaskan snow.
Testing the Repair for Waterproofness
Three key tests will guarantee your repair job’s been done right! Let’s make sure that patch isn’t going to let you down when you need it most.
First, fill your dry bag with air and submerge it underwater for thorough leak detection. Watch carefully for any bubbles – they’re the telltale sign of remaining holes!
Next, we’ll do a spray test. Use a water bottle to thoroughly wet the repaired area, then check inside with a tissue for any moisture.
Finally, let’s shine a bright light inside the air-filled bag in a dark room. This waterproof testing method reveals even the tiniest pinholes that might have escaped our notice. Additionally, ensuring your repair is made using materials that offer durability and waterproofing adds to the long-term reliability of your dry bag.
Remember to let the repair cure completely between tests. Don’t rush it – your gear’s waterproof integrity is worth the wait!
Recommended Products

Inflatable Roof Tent for Quick Setup – This rooftop tent features a fully inflatable frame for fast and effortless setup—just connect the air pump and you're ready for adventure in minutes.

All-in-One play: This inflatable water slide features slides, trampoline, climbing wall and splash pool, designed in soft pastel colors kids love, combining sliding, jumping, climbing and water play to keep screen-free

🏆【Ultimate 21-in-1 Battle Arena: Choose Your Destiny!】Turn your backyard into an epic racing circuit! Two challengers scale twin climbing walls, racing to the summit’s rain showers and making a split-second choice: the lightning-fast 7.9ft classic lane or the goliath 17.2ft super slide? Rocket through the arch into massive splash zone where the real combat begins! Dodge attacks from cannon, shark blaster, and a 10-ball arsenal of soaker balls. Land a victory basket while under fire to conquer the course! It’s a non-stop loop of racing and water combat for the ultimate summer champions!
Long-Term Care and Prevention Tips
While repairing holes is essential, keeping your dry bag in top condition is the real key to long-term waterproof reliability!
Let’s talk preventive maintenance – it’s way easier than dealing with repairs! After each adventure, wash your bag thoroughly with mild soap and water, making sure to get rid of that sneaky sand and dirt that loves to hide in the seams.
Store your dry bags like they’re royalty! Keep them in a cool, dry place away from direct sunlight, and never stuff them in airtight containers. We always recommend leaving them partially unrolled to maintain their shape and allow proper airflow.
Want to really extend your bag’s life? Apply vinyl preservatives occasionally, inspect for damage regularly, and keep those closure mechanisms clean. Trust us – your future self will thank you! Additionally, consider manual purge valves to enhance air expulsion while keeping water out.
Frequently Asked Questions
Can I Use Duct Tape as a Temporary Fix While Camping?
When push comes to shove, we’d say yes! Duct tape’s one of those temporary solutions we trust for camping gear emergencies. It’ll hold water out decently, but let’s remember to replace it with proper repairs later.
How Long Will a Properly Repaired Dry Bag Typically Last?
We’ll typically see a properly repaired dry bag last 2-3 years with regular use. However, repair longevity depends on material durability, usage frequency, and maintenance. With proper care, it could extend even longer.
Should I Repair My Dry Bag if It’s Still Under Warranty?
We recommend checking your warranty coverage first before attempting repairs. Contact the manufacturer to confirm eligibility – if covered, use their repair options. Self-repairs may void your warranty and compromise professional service benefits.
Can I Repair My Dry Bag While It’s Wet?
It’s tempting, but don’t repair your dry bag while wet. Even the best repair techniques and waterproof adhesives won’t bond properly on damp surfaces. Let’s wait until it’s completely dry first.
What’s the Maximum Size Hole That Can Be Effectively Repaired?
We can effectively repair holes up to 1 inch using proper repair techniques and patch materials. Beyond that size, repairs become less reliable, and holes larger than a few inches typically require professional help or bag replacement.


